31 August 2013


LADDER RIBBON LONG SCARF
THIS PATTERN IS COPYRIGHT PROTECTED
 ONLY FOR PERSONAL OR CHARITABLE USE
ITEMS KNITTED FROM THIS PATTERN CANNOT BE SOLD FOR PROFIT
 DO NOT REPRODUCE OR USE FOR ANY COMMERCIAL PURPOSE

ABBREVIATIONS
k: knit
st(s): stitch(es)
kfb: increase by knitting into the front and back of the same st
sl: slip
psso: pass slip st over
tog: together 
rpt: repeat

MATERIALS
25 grams of a ribbon ladder yarn such as Sirdar Firefly or Zip by V and A Products Ltd
10mm needles (US 15)
two large pendant beads
beads with a large hole 

INSTRUCTIONS
Make a slip knot, leave a long yarn tail of aprox 15cms (6ins), this will be used to attach beads later.
ROW 1 : k.
ROW 2 : k1fb (2 sts).
Tug work down as you go.
ROW 3 : k.
ROW 4 : k1fb, k1fb (4 sts).
ROW 5 : k.
ROW 6 : k1fb, k1, k1fb, k1 (6 sts).
ROW 7 : k.
ROW 8 : k1fb, k3, k1fb, k1 (8 sts).
ROW 9 : k.
ROW 10 : k1fb, k5, k1fb, k1 (10 sts).
ROW 11 : k.
ROW 12 : k1fb, k7, k1fb, k1 (12 sts).
ROW 13 : k.
ROW 14 : k1fb, k9, k1fb, k1 (14 sts).
ROW 15 : k.
ROW 16 : k1fb, k11, k1fb, k1 (16 sts).
ROW 17 : sl1 knitwise, k to end of row.
At the beginning of each following row slip the first st knitwise
Continue with garter st (every row knit) until work measures 100cms (39.5ins)
or required length.
NEXT ROW : sl1, k1, psso, k to last two stitches, k2tog (14 sts).
NEXT ROW : k.
Rpt the last two rows until 2 sts remain ending on an all k row.
NEXT ROW : k2tog (1 st).
NEXT ROW : k
Fasten off leaving a long yarn tail of aprox 15cms (6 ins). 
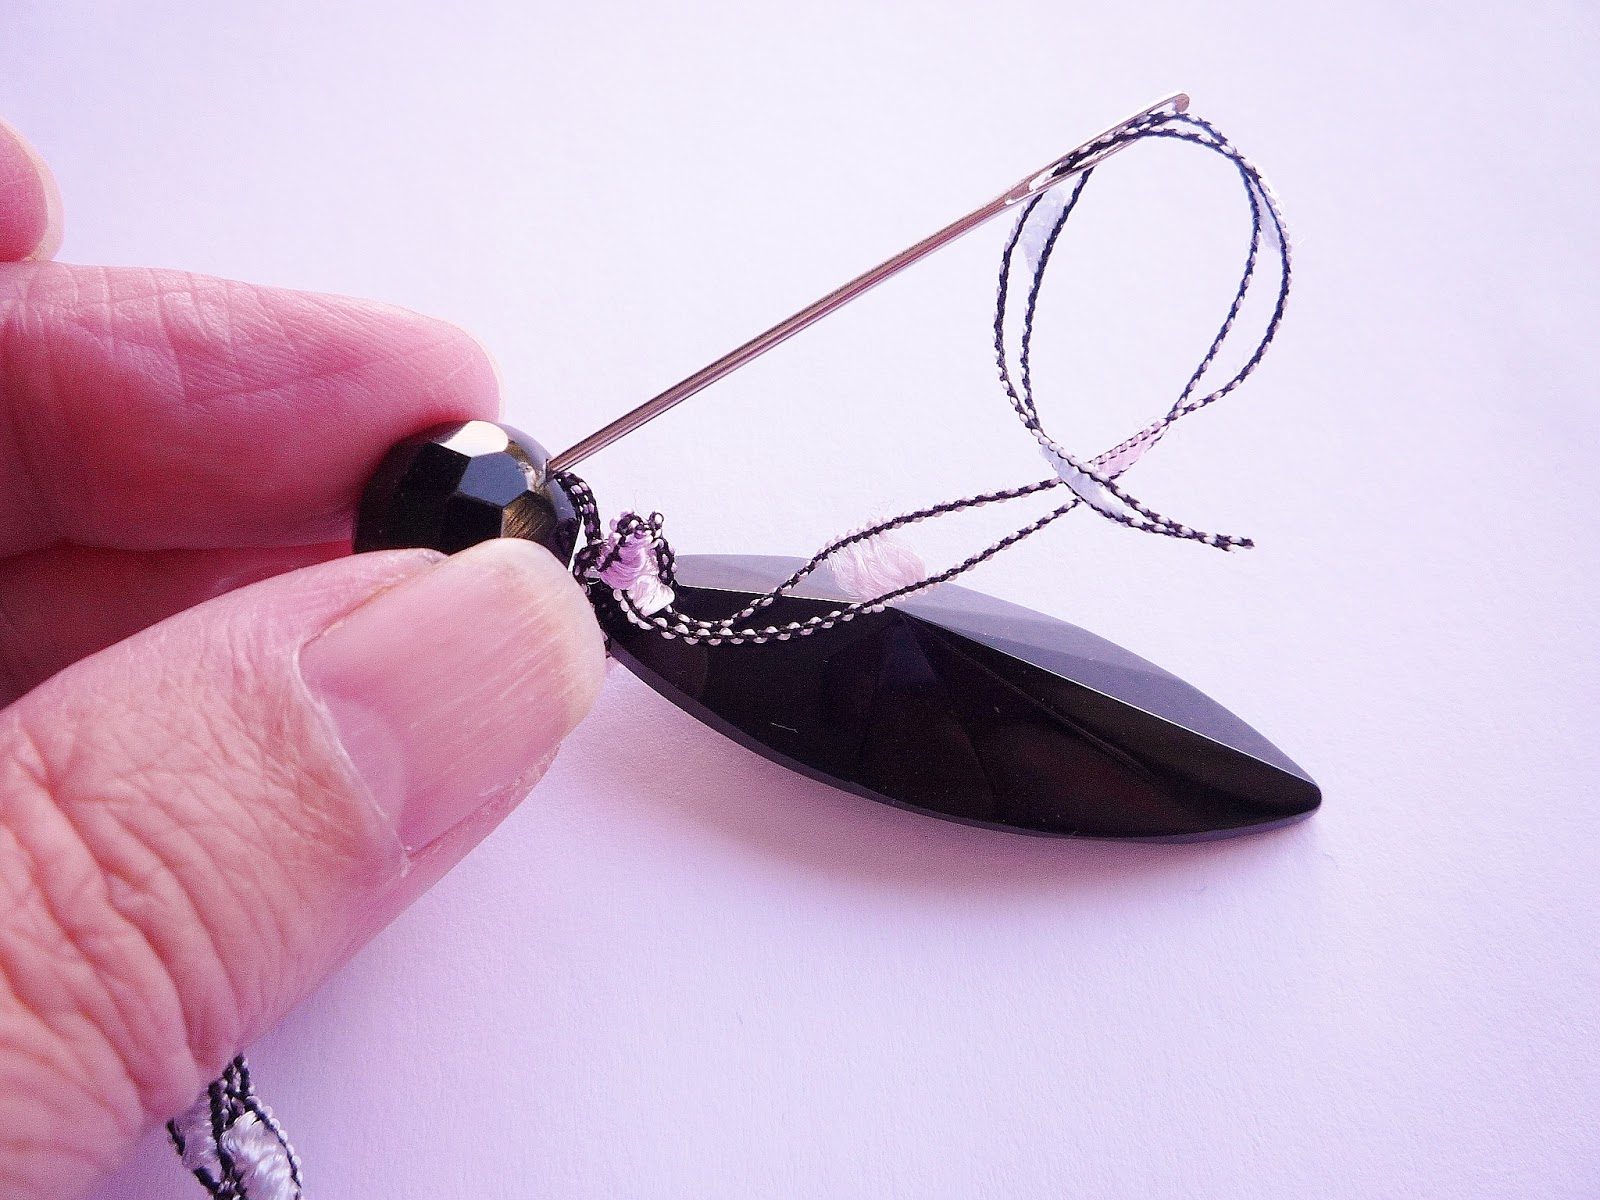
TO ATTACH BEADS
  • Thread the yarn onto a needle which will go through the hole in the beads.


  • Then thread the yarn through the beads leaving the pendant bead until last.
  • Thread through the pendant bead and then tie a knot at the top of the pendant bead.
  • Then thread the yarn back through the beads until you reach the starting point.

  • Knot the yarn, then weave the yarn tail up through the scarf.
  • Repeat for the other end of the scarf.


  copyright Alison Hogg 2013


26 August 2013

granny square blanket

'Fraid I haven't had much time for blogging or crafting this wee while. I've been busy getting things done before my son starts school tomorrow....new uniform, appointments etc. I finished the granny square blanket awhile ago and just getting to post photos now.


I think that's enough now with one "needle" I miss my two sticks, in fact I miss having an on going project, I feel a bit unsettled as I can't just sit and do nothing. So now that school is back, I'm planning to knit up some ribbon ladder yarn I bought at the market last week.


 Hoping to make a long skinny scarf and I'll post the pattern next week sometime, if anyone has a ball of this languishing at the back of their stash cupboard and wants to make use of it.
Bye, Ali.
 

8 August 2013

thursday night down town

Tonight the City Hall was illuminated in honour of the World Police and Fire Games, which are being held in Northern Ireland at the moment. The front of the building was illuminated with a flame effect.
 
 
 The dome was transformed into a flashing blue siren with red turrets.
 
 
The photos would have looked more stunning in the dark but unfortunately due to a heavy shower, I had to hurry home. I did take one last photo before I ran for cover.


Here's hoping for better weather tomorrow, Ali

2 August 2013

fused plastic bag picture

Continuing the theme or recycling and reusing plastic bags, this post is about fusing plastic bags with a household iron, to make a "fabric". Once fused the plastic is flexible and strong and can be stitched on, either by hand or by machine.

HEALTH AND SAFETY
When fusing the plastic bags do so in a well ventilated area and use appropriate breathing apparatus

What you need
plastic bags (different weights and colours)
scissors
clothes iron
ironing board or heat resistant surface
baking parchment
angelina fibre fusible hot fix (optional)
photo or image
sewing machine (optional)


Method
1. Find a suitable photo or image for inspiration.
    My photo was of Shasta daisies taken at night time.

 
2. Cut a piece of baking parchment larger than the size the finished artwork will be and place on the ironing board.
 
3. Cut a piece of plastic for the background. Use a thick plastic bag or several layers of fine plastic bags.
 
4. Cut or tear pieces of different colours and weights of plastic bags and arrange on top of the background to form the picture. Place small amounts of Angelina fibre to add a bit of sparkle. For the flower and moon I used different weights of white plastic bag. It is possible to put a layer of clear plastic (such as a garment or dry cleaning bag) on top for added strength, but the final "fabric" will have a matte appearance.


5. Cut a second piece of baking parchment, also larger than the artwork and place on top, to form a sandwich.

6. Set the iron to synthetic or rayon and do not use the steam setting. If the iron is too hot the plastic will shrivel up and holes will develop.

7. Iron from the centre outwards, keep the iron moving for about 30 seconds.


8. Flip the whole thing over and repeat the ironing process.

9. Wait for the plastic to cool down before carefully removing the baking parchment.

DO NOT TOUCH PLASTIC WHILE IT IS STILL HOT

10. If the plastic is not totally fused repeat the ironing process.

The fine white plastic bags shrivelled up, but I quite liked the effect.

11. It is now possible to stitch, either by hand or machine to add definition to the picture. I stitched on top using free machine embroidery.